10 must-have tools for very home improvement Enthusiast

Every home improvement enthusiast knows that having the right tools for the job is essential. Without a well-stocked toolbox, many DIY tasks become difficult or even impossible. Here are 10 must-have tools that every homeowner should have on hand for tackling repairs and renovations.

A cordless drill/driver is a versatile tool useful for many tasks like hanging pictures, installing shelves, and assembling furniture. Look for a drill with different torque settings and both drill and driver bits. A circular saw, preferably cordless, is great for cutting wood, sheet materials like plywood, and laminates. An adjustable wrench, like a crescent wrench, grips rounded nuts and bolts of different sizes.

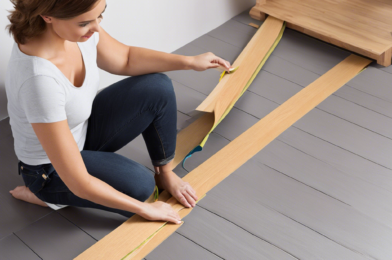
Pliers are useful for grasping and turning objects where fingers can’t grip well. Needle nose pliers are good for precision work. A utility knife, with extra blades, can cut through a variety of materials. A tape measure is essential for measuring and marking cuts. A level ensures that shelves, pictures, and other wall-mounted objects are even.

A hammer, for pounding in and removing nails, is a must-have. A set of screwdrivers in different sizes will tighten and loosen most screws. Allen wrenches or hex keys turn the hexagonal nuts and bolts often found on furniture.

A socket wrench set offers more torque for stubborn nuts and bolts. Safety gear like work gloves, dust masks, safety glasses, and ear protection keep you safe while tackling home repairs and renovations.

With the right tools on hand, you’ll gain confidence in completing more DIY projects around the home. Start with this basic set of essential tools and build up your collection over time as needed for the jobs you want to tackle. Home improvement is rewarding work, especially when you have the right tools to get the job done.

The Ultimate Guide to Choosing the Right Paint Colors

Picking the right paint colors for your home can be challenging. There are thousands of shades and hues to choose from, and the options seem endless. However, following some basic guidelines can help make the selection process easier. First, determine the mood you want to set. Do you prefer bright, bold colors that create an energetic vibe, or soft, muted tones for a more relaxed feel? The color palette you choose impacts the overall aesthetic of your space.

Once you settle on the mood, evaluate the natural lighting in each room. Darker shades tend to work best in rooms with lots of windows and natural light, while lighter colors help brighten up dim or windowless spaces. The amount of natural light a room receives is key to choosing a color that will make the space feel open and airy. Consider the function of each room as well. High-traffic, lived-in areas like family rooms and kitchens lend themselves better to darker, dirt-hiding colors, while bedrooms and bathrooms are ideal for light, serene shades.

Don’t forget to factor in existing furnishings and accents. The new paint color should coordinate well with items you want to keep to achieve a cohesive look. Accent walls are also a great way to incorporate bolder colors without overwhelming the space. An accent wall adds visual interest and a pop of color without requiring you to paint the entire room.

Test different color options before committing to a final choice. Paint swatches or samples directly on the walls in the space provide the most accurate depiction of how a color will look. View the samples in both natural and artificial lighting to ensure the color appears the way you want at any time of day. Compare multiple swatches of different shades side by side to determine which hue you prefer.

Once you’ve selected your colors, invest in a high quality paint for the best results. Check the specifications to make sure the paint is suitable for your needs. A durable, washable paint works well for high-traffic areas, while a paint with built-in primer helps when covering dark colors. Following these tips will help you choose paint colors you’ll enjoy for years to come. With so many options, selecting the right shade for your space may seem daunting, but by determining the mood, evaluating the lighting, and coordinating with your furnishings, you’ll find colors that you love.

5 DIY Home Repairs You Should Never Attempt Yourself

Installing electrical wiring is extremely dangerous if you have no experience. One wrong move could cause a fire or electrocution. Leave wiring and electrical work to the professionals.

Plumbing repairs seem straightforward, but are more complicated than they appear. A small leak or clog can easily turn into water damage costing thousands if not handled properly. It’s always best to call a licensed plumber instead of attempting DIY plumbing yourself.

Re-shingling a roof is difficult and hazardous. It requires working at extreme heights, often in very hot weather. Shingles are heavy, and if installed incorrectly can be blown off by high winds. Roofing should only be done by professionals with proper safety equipment and training.

Installing or repairing gas lines is extremely risky and should never be done as a DIY project. Gas leaks can be deadly, and the proper installation of gas lines requires a professional. Call your gas utility or a plumber to handle any installation or repairs needed.

Structural repairs to foundations or load-bearing walls should always be left to the professionals. Improper repairs can compromise the stability of your entire house. A contractor and often an architect or engineer should evaluate and repair any major structural damage.

Painting the exterior of a house often seems like an easy DIY task, but in reality requires proper training and safety equipment to do well. Exterior house painting also requires tall ladders and scaffolding, which can be hazardous to use without experience. It’s best left to professional house painters.

Tile installation is difficult to do well and requires training to be waterproof and prevent cracking. Uneven or improperly installed tile can easily lead to water damage, mold or mildew problems. Leave tile installation and repair to experienced professionals.

Most homeowners lack the proper tools, training and experience to handle major home repairs and renovations themselves. Although DIY is tempting to save money, it often leads to greater costs down the line from improper installation or repair. Your home is too valuable to put at risk. Leave major projects to the licensed professionals.

How to Create a Gallery Wall in Your Home

A gallery wall is a creative way to display art and decorate your home. To create an eye-catching gallery wall, start by determining a theme or color palette to tie all the pieces together. Gather art that you already own or purchase new prints that match your desired theme. Once you have a collection of art ready to hang, lay it out on the floor and arrange the pieces into a pleasing composition before hanging anything.

Think about the layout of your wall space and arrange the art in a way that fills the space attractively. A symmetrical layout with evenly spaced, same-sized pieces can be simple but elegant. For a more eclectic look, arrange the pieces at varying heights and spacing. Include a mix of sizes, vertical and horizontal orientations, framed and unframed pieces for visual interest. Step back and review how the arrangement looks from a distance to ensure there is good balance and flow.

Next, measure and mark the wall to indicate where you want the center and edges of each piece. Hang the centerpiece first, then work your way out from there. Use a level to make sure each piece is even. For framed pieces, use picture hanging hardware and secure the frames snugly to wall studs where possible. Use wall anchors for lighter pieces where there are no studs.

Add final touches like lighting, plants or decorative objects to complete the look. Spotlights, sconces or natural light from windows will help highlight your gallery wall. Small tables, chairs or benches placed in front of the wall also invite people to sit and enjoy the view.

With some time and patience, you can create a professional-looking gallery wall in your own home. Start with a cohesive theme and arrange the art in an attractive composition before hanging anything. Measure, level and securely hang each piece. Add lighting and accessories to complete the look. Step back and admire your work—you’ve created a custom art installation to enjoy for years to come!

The Art of Upcycling: Turning Trash into Treasure

Upcycling is the art of taking used materials and objects and transforming them into something new and useful, often with an artistic twist. Materials that would normally be thrown out are given a second life, keeping them out of landfills and reducing waste. Upcycling is an eco-friendly alternative to recycling and helps foster sustainable living.

Old furniture is a favorite material for upcycling. Chairs, tables, dressers and more can be refurbished and repurposed. A coat of paint or new hardware are easy ways to give furniture a facelift. More ambitious upcyclers may combine pieces or add decorative touches to create an entirely new piece. Old wooden pallets are also popular for upcycling into furniture, shelving units and other items.

Clothing and textiles are easily upcycled into new goods. Old t-shirts can be turned into cleaning rags, quilts, braided rugs or rag rugs. Denim jeans are frequently upcycled into bags, pouches, and other accessories. Vintage dresses and suits can be restyled into modern clothing or reworked into children’s clothes and doll outfits. Remnants and scraps of fabric are used to make quilts, pillows, and other home decor items.

Upcycling is a creative outlet for many crafty individuals. Artisans upcycle materials into jewelry, sculptures, dream catchers, candle holders, planters and much more. Old glass bottles and jars are frequently upcycled into vases, terrariums, and decorative storage containers. Tin cans are used to make pencil holders, organizers and decorative items. Driftwood, fallen branches, and twigs are popular for making rustic decorations and sculptures.

Upcycling helps communities by keeping usable goods out of landfills and supporting local artisans and craftspeople. It fosters sustainable living by reusing materials in an eco-friendly manner. Upcycling enables people to repurpose materials into new items that are both useful and beautiful. With some creativity, trash can indeed be turned into treasure through the art of upcycling.

15 Clever Storage Solutions for Small Spaces

Living in a small space often means getting creative with storage solutions. When closets and cabinets are limited, you need to utilize every nook and cranny to keep clutter at bay. One option is to use space under the bed for extra storage. You can find bed risers that lift the bed a few inches off the floor, allowing you to slide underbed bins or drawers underneath. If the bed doesn’t have a frame, you can place the mattress on a base with built-in drawers.

Another place often overlooked is the area above doorways. Install some shelving over the door to store items you use less frequently. Make sure to secure the shelving to wall studs for safety. You can also install wall-mounted drop-down tables or fold-out tables to provide extra surface space when needed. When not in use, they fold up and out of the way.

In the living room, use ottomans or benches that double as storage spaces. Look for options with hinged lids or tops that lift off to reveal a hollow center. You can store anything from linens and pillows to toys and books inside. Nesting tables are also useful, allowing you to pull out as many tables as you need and then slide them back together when space is needed.

In the kitchen, install magnetic strips on the wall to store knives, utensils and other metal tools. This frees up drawer space for other items. You can also install wall-mounted magnetic boards or mesh boards to hang mugs, pans and kitchen tools. For additional cabinet space, install pull-out drawers, lazy Susans in corner cabinets and vertical space dividers.

Double up on furniture that serves multiple purposes, such as stools that can be used as side tables or additional seating. A folding screen can be used to partition off space in a studio apartment or used as a space divider in an open floor plan. When not needed, simply fold up the screen and store it away.

Use the inside of cabinet doors to hang racks, bins and shelves for extra storage space. Install towel racks, spice racks and wall racks on the back of doors to keep everything within easy reach. For smaller items like tools, utensils and makeup, install shallow wall bins. Label each bin to keep everything organized.

In the bathroom, look for space above the toilet for shelving or cabinetry. If you have a pedestal sink, install a shelf behind it to hold items you use daily like soap, toothpaste and lotion. Over-the-door organizers that hang on the back of the door can hold a variety of bathroom supplies as well as towels, hair dryers and other accessories.

Maximize vertical space in the closet by installing shelving up to the ceiling. Use matching or stackable bins, baskets and drawer units on the floor of the closet to keep everything contained. An accordion-style door can open up a small closet space, and scarf or belt hangers on the wall provide extra hanging storage for small clothing items and accessories.

How to Improve Your Home’s Energy Efficiency

Improving your home’s energy efficiency is one of the best ways to save money while also helping the environment. There are many low-cost or no-cost steps you can take to make your home more energy efficient and eco-friendly.

First, find and seal any air leaks in your home. Gaps and cracks in walls, floors, attics, basements and roofs can lead to heat loss. Use caulk, weatherstripping, door sweeps or repair damaged areas to plug these leaks. This can improve your home’s insulation and reduce heating and cooling costs.

Next, ensure you have adequate insulation in your attic, roof, exterior walls, basement, crawl space and floors. Add more insulation if needed. Insulation helps prevent heat transfer and can make a big difference in your energy usage and costs.

Also, be sure to turn off lights, electronics and appliances when not in use. Use Energy Star rated light bulbs which are more efficient than incandescent bulbs. Choose efficient appliances and electronics which consume less energy. These small changes can significantly lower your utility bills over time.

Consider using a programmable thermostat to more efficiently control the temperature in your home. Lower the temperature in the winter or raise it in the summer when you are away or sleeping. A programmable thermostat can save up to 10% on heating and cooling per year.

Check your water heater temperature. Lowering it from 140 degrees to 120 degrees can save energy and money. Consider insulating your water heater and pipes as well to improve efficiency.

When replacing old appliances, choose Energy Star rated models which are more efficient. They may cost more upfront but will save money and energy over their lifetime.

Talk to your utility companies about budget billing or equal payment plans. They help avoid variable utility bills and make costs more predictable. Some utilities offer free energy audits to help you identify more ways to improve efficiency.

Take advantage of available tax incentives, rebates and financing for energy efficient home improvements. Tax credits, rebates and low-interest loans can help offset the costs of upgrades like insulation, new heating/cooling systems, renewable energy systems and more.

The Beginner’s Guide to Tiling Your Bathroom

Choosing the right tiles can make or break a bathroom remodel. For beginners, tile selection and installation can seem complicated, but with some helpful tips you’ll be well on your way to tiling your bathroom like a pro.

First, determine your budget and style. Ceramic and porcelain tiles tend to be the most affordable, while natural stone and glass tiles are higher-end options. For a classic look, consider neutral tones like white, grey or beige. Want to make a statement? Bold patterns and colors are trending.

Next, measure your space and calculate the number of tiles you’ll need based on the manufacturer’s recommended coverage. Buy about 10% extra to account for waste. You’ll also want to purchase tile spacers, grout, a trowel, and sealant.

When installing wall tiles, start in the center of the wall. Use a level to ensure the tiles are even. Apply tile adhesive to small sections of the wall at a time, then place tiles and press firmly. Wipe away any excess adhesive with a damp sponge.

For floor tiles, start in the center of the room. Apply tile adhesive and place tiles, leaving gaps for grout lines. Use spacers to ensure even gaps. Let the tiles set for at least 24 hours before grouting.

Grout seals the gaps between tiles. Mix the grout according to package directions and apply with a grout float, wiping away excess with a sponge. Clean the tiles with a damp cloth once dry.

Seal porous tiles like natural stone to prevent staining. Apply 2-3 coats of sealant, waiting for it to dry in between. Re-seal every few years to protect your investment.

Ceramic tiles can last 30 years or more with proper care. Sweep regularly to prevent grit buildup. Mop floors and wipe down walls as needed using a pH-neutral cleaner and water. Avoid abrasive cleaners which can dull the tiles.

With some patience and the right tools, tiling a bathroom can be a very rewarding DIY project. Take your time to get it right and you’ll enjoy the results for years to come. Your newly tiled bathroom will provide both function and style.

5 DIY Landscaping Projects to Boost Your Curb Appeal

There are many simple DIY landscaping projects you can do to boost your home’s curb appeal without breaking the bank. One easy way to make your front yard more attractive is to add mulch around trees, shrubs, and garden beds. Spreading a fresh layer of mulch not only helps your plants retain moisture, it also gives your yard a tidy, polished look.

You can also dress up your walkway by lining it with solar path lights or tiki torches. Place them a few feet apart to illuminate the path at night. Solar lights don’t require any wiring, so installation is simple. Just stick the lights in the ground along your walkway and the sun will charge the batteries during the day.

Adding container gardens is an simple way to make your yard more inviting. Group a few planters together near your front door or on your porch. Choose flowers, greenery, and foliage that complement your home’s exterior and architectural style. Water the plants regularly to keep them looking fresh and vibrant.

Does your yard have bare spots or lack color? Plant some flowering shrubs to fill in empty areas and provide seasonal blooms. Azaleas, hydrangeas, and rhododendrons do well in many climates and provide colorful flowers in the spring and summer. Place a few in your front yard for an easy boost of curb appeal.

You can also improve your home’s curb appeal by giving your front door a fresh coat of paint. A vibrant, glossy door color can make your entire home exterior pop. Consider colors that complement your home’s siding and trim. Also, add matching planters, a door mat, house numbers, and a door knocker for the perfect finishing touches.

With some simple DIY projects like these, you can improve your curb appeal and make your front yard more welcoming without a major investment of time or money. Your neighbors and guests are sure to notice the difference! Enhancing your home’s exterior and outdoor space pays off in the long run.

How to Lay Flooring: A Step-by-Step Guide

Installing new flooring is a great way to improve the look and feel of any room. However, for those who have never done it before, the process can seem complicated and intimidating. The good news is that with some patience and the right tools, installing flooring is actually quite doable as a DIY project. Here are the basic steps to get you started.

First, you need to determine how much flooring you need. Measure the length and width of the room in feet to calculate the square footage. Buy at least 10% extra to account for waste. Make sure you buy flooring that is suitable for your needs based on the room’s moisture and traffic levels. Purchase any additional supplies like underlayment, spacers, or trim.

Next, prepare the subfloor. Remove any existing flooring and inspect the subfloor for any damage that needs repairing. Install underlayment if needed, securing it in place with a moisture-resistant adhesive or double-sided tape. Make sure the subfloor is clean, smooth, and securely fastened before moving on.

Lay out the flooring in the room to determine the best layout. Place spacers between each plank or tile to ensure consistent gaps. Make cuts as needed for the edges and corners of the room. Number each plank or tile on the back as you go to keep them in the proper layout order.

Begin installing the flooring in the corner of the room. Place the first plank or tile so it is perfectly aligned in the corner. Secure in place with adhesive, nails, or a tapping block and mallet, depending on the type of flooring. Continue adding pieces, using spacers to keep everything evenly spaced.

Once the floor is installed, you need to add trim and transitions. Use a miter saw to cut the trim to fit around doors and windows. Attach the trim pieces to the walls to finish covering the edges of the flooring. Add threshold strips or transition pieces where the new flooring meets existing flooring like tile, wood, or carpet.

Finally, add the finishing touches. Use a roller to adhere vinyl or linoleum flooring firmly to the underlayment. Add sealant or polyurethane to wood flooring for protection. Install vents, grates, molding, or baseboards. Add furniture pads to the feet of heavy furniture before moving everything back into the room.

Congratulations, your new floor is now complete! With some time and patience, you have successfully installed new flooring yourself. Enjoy your updated space!